Archive for January, 2010

More progress, another extruder fail, and a full blown crisis…

Thursday, January 21st, 2010

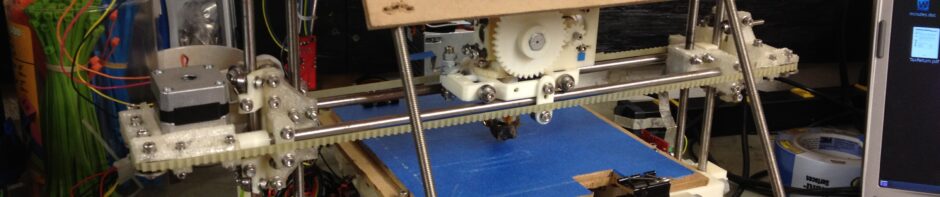
As the title of this post says, I made some more progress, I had another extruder failure, and then I had a huge, full blown crisis.

In order:

Progress. Here are some pictures of the Idler Bracket assembly:

Assembled Idler Bracket. This sits on one end of the X-axis. The four bearings allow the entire X axis to slide up and down along the Z axis. This piece holds/caps the two rods that make up the X axis.

Another view of the Idler Bracket assembly. The bearings on this side are for the belt that moves the X carriage left and right along the X axis.

Another view. The x-axis rods will go through the U-shaped space up against that plate.

View from the bottom of the Idler Bracket assembly.

I’d ordered some more ceramic tape so I could insulate the barrel again. I think that was a part of the problems I’d been having with PLA jamming up. I couldn’t make it as tall as it had been initially but I insulated at least part of the barrel:

Once that was on, I was able to print a few more parts correctly. By the way, I now print at 195C (using the ultimachine 4042D PLA.. I have some 4032D from makerbot.com but I haven’t used it yet).

x-vert-drive-side-plate-360-end_2off

This piece was horrible with PLA. I think I may go back to ABS for it and its similar siblings:

Horrible version of x-360-z-bearing-plate_2off. I will retry this piece with ABS.

So last weekend we met my parents for lunch at The Olive Garden. You know you’re too much into your RepRap work when you bring RepRap pieces and assemblies into the restaurant:

I tried printing this next piece 4-at-a-time with the Multiply plugin in Skeinforge at least twice until I gave up and did them each by hand. The difference in this case was night and day – it was a FAR better print as a one-off:

x-vert-drive-nut-trap_4off

Two x-vert-drive-nut-trap_4off's, with an M8 nut in place

A successfully trapped M8 nut, between two x-vert-drive-nut-trap_4off parts

So then at some point I wanted to finally get around to making the “thin-sheet” opto-endflag parts out of aluminum Coke cans. (Tangent warning) While I’m talking about opto-endstops, let me make my opinion clear on something. I’ve heard that Makerbot is no longer going to ship opto-endstop boards with their Makerbot kits because no one uses them. Well let me start out saying that I don’t use them on the Makerbot I’m using as a RepStrap, but I wanted to, and I certainly will be using them on my Mendel. They’re installed, just not being used. There are multiple reasons I don’t use them on the Makerbot:

1. The Popsicle stick slots on the Y carriage don’t line up with the opto-endstops on the side of the case, mounted correctly on the holes provided. Yes, I could line it up and drill the correct holes, but I didn’t. If this were my permanent machine, I might, if it weren’t for item #3 below.

2. The Z axis doesn’t even have a place for an endflag. You have to print your own out (which I did), mount it on the side (which I did), and hope that it doesn’t scrape up against the side of the wooden case and impede Z motion. Still, I have the printed one mounted on the table, but by design it’s not long enough to reach the endstop, so you’re supposed to put tape or something on the bottom. The one I printed out was ABS, so it’s warped, so I haven’t even bothered trying. Again – fixable, but this shouldn’t be something that people optionally do – it should work for everyone.

3. This is the biggest reason I haven’t bothered to get it all working: there are recurring stories of correctly mounted endstops not reacting well to events! I haven’t looked into those particular issues much because my endgame is a Mendel, but the stories say that the firmware doesn’t handle it well, etc.

I think it’s a shame that everyone doesn’t have an auto-homing device that uses the endstops at the beginning of each build to home itself and print correctly every single time. When we built this Makerbot we’d have installed the endstops and had it working (at least as well as the firmware allows) if we hadn’t read the line “It’s actually possible to run the Cupcake CNC with no endstops at all!” at 2:30am. The confusion surrounding the CAT5 cables and which pins to wire didn’t help much either. I’m looking forward to Mendel’s 3-endstop solution with correct homing behavior.  (at least I hope its behavior is correct! I haven’t checked recently).

But I digress. Like I said, I wanted to build my endstop flags, so I did:

Redrawing the templates to scale by hand was easier than getting the DXF file to print unscaled.

One coke can sacrificed its life, delivered me a delicious beverage, and produced 4 sets of opto endflags (3 spares each).

Here's the rest of the Coke can. These pieces don't get to live on forever in a RepRap. 🙁

Late Sunday, the Makerbot plastruder jammed again. This time it was plastic stuck in the acrylic that I just couldn’t get out. I took the plastruder apart, got the plastic out, flossed the gears for the hell of it, put it all back together, and then before reattaching the heater barrel assembly I figured I’d heat it up to let molten PLA drain out. Sigh. Something happened (don’t remember what), and eventually I had no temperature reading. I looked down and I’d pulled out one of the wires going to the still-intact thermistor (despite a pretty good crimp I thought). Damn.

Now though I was stuck with the problem that I had this M6 nut behind the metal retainer ring thing there, and it wouldn’t budge. So I couldn’t make room to get in there to unwind just the thermistor and the kapton tape around it. After enough fumbling trying to do that, I felt something give, and instinctively knew I’d just ruined the heater connection (and I had).

I stripped the heater barrel all the way down, again:

PTFE sure does flow.. you can see where the belt clamps were, and where it flowed around that.

Had to tear off that nice insulator that I'd just put on days before.

Full Blown Crisis

So, that wasn’t even the crisis.

Tuesday I go into work, and I’m sitting in a meeting. Chris (who built the Makerbot with me, and whose Mendel we’re building pieces for as soon as mine is done) handed me his phone. On it was an email from the secretary of the CTO where I work, telling us that there was a need for the Makerbot, and could we return it.

Ddddoooohhhhhhhhhhh…

By my count at that point I had 27 pieces left to print (I believe now that it’s actually 23, and probably really only 20, since I could get by without 3 of the pieces to space out circuit boards etc, and have the Mendel print its own final pieces, which would actually be pretty damned cool). The email mentioned something on January 27th, next Wednesday. That was 8 days away, and we had no idea when they wanted this back. Disaster! If I don’t have enough pieces to make the Mendel, then functionally I’m exactly where I was two months ago – without any exit strategy – no way to get the final pieces I need.

I experienced a good amount of panic that day. Yes, I’m sure after telling this story I could talk someone into letting me keep the Makerbot. My concern though was whether there was someone else in line for this, waiting this whole time. I didn’t want to have to risk the idea of someone else taking this Makerbot, which I’ve had to repair at least 7 times now in one fashion or another, and breaking it in a way that I couldn’t easily repair it from. I didn’t want someone else taking this away for 2+ months, leaving me with no way to finish my own printer (with which I could print other printers).

Looking further into the situation, it turns out the desire is to get the Makerbot for a 3D printing class being held next Wednesday. I’d actually been looking forward to that class already – I signed up a week or so ago, and I’d been looking forward to it since around the time that I started working here in October (it was on a schedule). Chris and I walked down and talked to the guy running this class. Thankfully, he just wants it in the class to show off, and he’s fine with us taking it back on Thursday. As it turns out, now I’ll be saying a few words about it in class! I’d been looking forward to the class for months, and as it turns out, the class had been looking forward to me.  😀

Of course, the Makerbot was still broken. This morning, I woke up at 7am, showered, got dressed for work, and headed down to the basement to rebuild the heater barrel assembly before work. I timed myself, for future reference (because for at least two days I dreaded the work of rebuilding the barrel – it’s just a pain). From a bare barrel to a Makerbot extruding PLA was 2 hours 45 minutes. Twenty of those at the start were just lining up the pieces I need. I decided to take a picture of that “heater barrel assembly kit” so I’d have a checklist for next time. Fumbling around looking for tools in the middle of a task like that is what makes it a variable length task to dread.

Here are the tools/pieces I use:

Heater barrel assembly building kit/checklist

As it turns out I only missed two tools – regular wire strippers, and a small pair of scissors to snip the kapton tape.

In no particular rush, it took me a ridiculous 72 minutes just to get the right length of nichrome wire connected to two wires, crimped, covered in solder for the hell of it, and wrapped in kapton tape.

At the end, I once again had a working extruder:

Extruding again! Woohoo!

So now the challenge is to either finish the remaining 20 pieces before next Tuesday morning (when I have to bring the Makerbot into work), or to make sure I get the Makerbot back after both classes on Thursday afternoon. I’d had a vague hope of finishing the printed parts by my birthday (January 25th, this Monday), but at this point I don’t think I’m gonna make it. But at least the Makerbot is working again!

33 pieces of bot on the wall..

Monday, January 11th, 2010

The countdown continues! 33 pieces left to print!! (out of 106)

(To the impatient – make sure you at least see the last video in this post, but really, you should be reading/watching all of it. 🙂 )

Before I was able to print out any more pieces I had to try rectifying this extruder-stops-extruding-PLA problem. Since my last blog post I’d discovered that sometimes I could just twist (rotate) the filament to get the motor to catch, instead of just pushing down hard. I also noticed that it seemed like my pushing/twisting would only be effective if the motor was about to change state. For example, I might push/twist like crazy with no luck, until it went to circle a vertical hole, at which point it would always catch. I think that when the motor fails to push for some reason (blockage, non-melted piece, covered nozzle, whatever) it “shuts off” for the rest of that command (I don’t know the extruder board firmware/hardware or the details of the extruder motor enough to validate this observation.. anyone?).

So now twisting is a part of my concern. Even with a lazy susan, PLA coils up something awful, which has to be putting rotational torque on the filament while in the extruder. So one thought I had was that maybe the teeth were dug in but then the piece twisted in some way that it couldn’t grip it anymore. (doesn’t make too much sense but the thought persisted).

So, I took apart the plastruder again and moved the idler wheel even closer to the teeth, not even using the metal spacer (I figured the spacer was made for 3mm filament, and the ultimachine PLA seems to be 2.8mm (that’s from memory, trust my earlier blog posts if they contradict that measurement)).

That helped. I think. It didn’t eliminate the problem, but it does seem less frequent.

What I also did was floss out the teeth on the extruder motor gear.. They certainly had some plastic stuck in there.

Flossing out black ABS from the extruder teeth

Flossing out barely visible PLA (to the left of the pick) from the extruder teeth

My guess though is that that was never really the problem. If the caked teeth had been unable to grip filament, then I should have always heard the motor running but never actually pushing out plastic. Instead, I hear NOTHING when it has this problem. This again lends towards the idea of some kind of jam/blockage/other-motor-resistance (causing the motor to shut down until the next command).

Here’s a video where I try to document/record/illustrate the problem where the extruder motor stops even trying to push. You have to turn the sound way up and try to ignore the sound of the motor of the X and Y axes, and instead listen for the shhhhhhh shhhhh shhhhhh sound of the extruder motor:

Without any actual knowledge of the situation, I’m secretly hoping that the stepper-motor-driven Mendel extruder handles this problem better, but I have no idea whether it’s actually better or worse.

Next, for lack of a better place to put it, here’s a complete non sequitur: possibly the most exciting RepRap video ever recorded:

Assuming you’ve recovered from the exitement of that video, let’s continue. Ok.. So I was able to make some new parts.. There was this one, from the end of that last video:

x-180-z-bearing-plate_2off

..and then I got brave and tried using the Skeinforge Multiply filter to make more than one of the same part, with somewhat acceptable levels of success:

x-bar-clamp-m3_6off, done with Multiply

Here’s another part, which would be almost impossible to print in ABS without a heated bed or heated chamber:

Printing x-end-bracket_2off with PLA

Two instances of x-end-bracket_2off, both missing some plastic at the highest levels in those bars

A picture of all of the pieces I’ve printed since the last blog post:

The most recently printed pieces to my Mendel RepRap

Of those, here was my favorite:

x-vert-drive-side-plate-180-end_2off. When I see this piece I think of Halo 3 and Forge, as if that were a staircase leading to a ledge.

While printing parts, I also assembled more of my x-carriage. I was able to fit the M4 hex nuts into their recessed holes (despite the poor construction of the x-carriage-upper piece I’d printed) by using a soldering iron to just push them into the plastic (which worked amazingly well). That let me attach four bearings to the upper piece, and bolt it to the lower piece.

x-carriage assembled (upper and lower parts connected, with belt clips, bearings, and fasteners), sans extruder.

Another view of the x-carriage

A particularly cool view can be seen here, where you see how the carriage mates with one of the two parallel bars that the x-carriage slides on along the X axis. Note the three bearings in the front of the picture as well as the three bearings way in the back. One of the smooth bars slides through all of those bearings.

This tunnel is where one of the smooth bars goes through. See how bearings from three sides limit Y translation, Z translation, Y rotation, and Z rotation.

On the other side of the carriage is the four bearings that go with the 2nd rod, which keep the entire carriage from rotating around the X axis formed by the first rod:

These bearings on the opposite side prevent rotation around the X axis, which in combination with the bearings from the other side restrict motion to only translation along the X axis.

And here are two good shots of those snug-in-their-melt-assisted-holes trapped M4 hex nuts:

A view of the trapped hex nuts that I massaged into their poorly-built hex-shaped holes with a soldering iron

More soldering-iron-helped trapped hex nuts

And of course, finally, video:

Thirty three more pieces left!

Pain and Promise

Monday, January 4th, 2010

“Aagghh!!!” That’s one way to describe the past few days (Friday through Sunday) of my RepRap experience.

PLA has been an extreme pain. My first sign of major problems was in trying to print the z-tensioner piece out of PLA. This looks like a relatively easy piece to print, but my first two attempts failed. The first was some random unattended mistake:

The second though showed the problem I’ve been wrestling with all weekend. Check out the top part of the print in these pictures:

At some point the extruder stops extruding, and if I’m not there to correct it (by pressing hard on the filament and/or turning it etc), then it will leave the rest of the build unfinished. More on that below.

So I put that piece on hold, and tried printing the x-180-z-bearing plate, and that’s when the heater barrel pushed out (again!):

Frustrated, I went to the store. The good news is I bought a lazy susan for the PLA supply, and lots of that Scotch Blue Painters tape (#2090) that Adrian mentioned in August (the tape works awesome.. but I’m getting ahead of myself). Having either a spool or a lazy susan really is important with PLA, because twisting becomes a serious problem. It still doesn’t feel solved. If you buy a lazy susan, go with a large one; I wrestled with a $5 difference (I was at Target and had a choice between a $13.59 11″ or a $18.79 16″), and mistakenly picked the 11″. The spool of PLA had measured about 10″ before, but then it unwinds and actually started getting stuck in between the rotating part beneath it. I put a piece of cardboard beneath it for now, but I’ll probably go return it and get the larger one. [Update: Laurie’s so awesome – she’s returning it for me while at Target tonight]

Back to the pain. I had to disassemble the plastruder to get the PLA filament out (actually, I only went as far as unscrewing the bolt holding the large acrylic wheel, which I keep hoping was the cause of my later problems, but that’s a false hope because as I described above, I had the problem before touching the plastruder). Here was what the filament looked like:

So. I needed a new PTFE insulator. I’d told myself that next time I made one, I’d make a bunch. So that gave me the excuse to create a centering jig for the PTFE rods, leading to this video:

Great, I made four PTFE insulators, and put three in a ziplock bag for use in the probably-not-too-far-future. Then there was just the matter of heating up the heater barrel to get any PLA blockages out. Except that’s when I realized that the heater wire connection had broken, and I had to completely redo my heater barrel, all the way down to putting on new nichrome wire. 🙁 (At least the thermistor was still working!)

I rebuilt the barrel, and this time put an M6 nut on to keep the barrel from pushing out of the PTFE so easily. Unfortunately it’s not a thin nut, so it uses up more of the barrel. It also acts as a heat sink. All of these things to through my mind when trying to diagnose the PLA jamming problem (maybe the heat sink makes for a cold area in the barrel which solidifies liquid PLA), but again, I keep forgetting that I had the problem BEFORE rebuilding the barrel. Writing this stuff down sure helps.

So now that it was re-wired, I heated it up and pulled out the semi-molten PLA..

I put it in the plastruder, mounted it back in the MakerBot (forgetting to put on any hose clamps), and started a test extrusion, which worked for a short amount of time. Then, total dismay.. I saw PLA leaking out near the nut:

Pulled it all out, tightened the nut like crazy, put two hose clamps on, and put it all back together.

Finally I had a working RepStrap again.

Then I went to print. The test extrusion at the beginning almost always fails; either PLA doesn’t come out, or it comes out and curls up and clings to the heater barrel like spray cheese on a ritz cracker, or I push the filament down by hand super hard and it eventually catches. After pressing down until a good base of the x-carriage-lower piece was laid out, I had a promising print going:

Success, kind of?

Then, I went through around 3-5 attempts of printing the x-carriage-upper piece go to above that. Each one failed ultimately because the extruder stopped extruding. I’m no longer convinced it’s a blockage (or that it’s always a blockage – I could have overlapping problems). I think that the extruder isn’t able to grip the filament well sometimes. I tried reversing the extruder after one of those times to examine the filament and look for a worn off part that it couldn’t grip, but I couldn’t find anything conclusive (although maybe that time it was a blockage instead). Aagghh. So one thing I did is I recompiled the 1.6 extruder firmware and changed the motor reverse speed to 0, so it wouldn’t do the reverse-the-motor-to-prevent-ooze trick (the thought being that maybe melted PLA was being pulled back up to an area that was cool and it solidified). That didn’t fix it.

So out of my frustration printing that piece, I felt the need to cheer myself up, and I decided to assemble my first pieces together!

That was enough motivation for one more try Sunday night to get a working x-carriage-upper piece printed. It was not easy. Basically 2.5 hours of babysitting and being a human-powered extruder motor assist.

A video I call “Lowered Expectations”:

There ya go. So, PLA = lots of pain, but it’s a way to actually get non-warping pieces without a heated bed (which at some point I’ll revisit). I’m psyched that I was able to make it far enough to actually assemble something. That x-carriage-upper piece is so messy that almost none of the captive nut areas work, so it’ll be interesting to see if I can actually use it, but I’m hopeful. Of course, I’d rather have a reliable printing process that I could walk away from and print another one that worked! 🙂

Technically, I’ve started assembly of my Mendel! Woohoo!