Archive for August, 2010

Watertightish mugs then extruder fail

Sunday, August 22nd, 2010

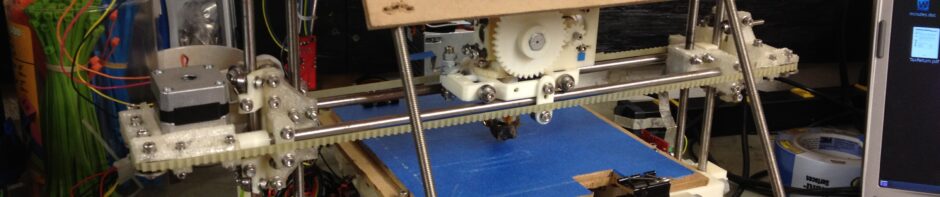
This week I printed one minimug with a watertight base (but leaky walls), then another so watertight that I could fill it to around 80% before any leaking occurred, … and then my extruder pushed the heater barrel out , killing my extruder. 🙁

Here’s the first of those two minimugs:

Look at the bottom of this mug:

Then I checked to see if it could actually hold water:

Then I made another mug, this one was much better. JeffTry28:

Check it out! It actually held some water!!

Then I added even more.. As you can see, I got to around 80% full before it started leaking:

The next day I tried printing more mugs, none of which really came out well. This one looked like Eraserhead:

..and then tragically, in front of a bunch of witnesses, the extruder barrel pushed right out of the PTFE, ending the life of this extruder:

I haven’t yet taken it all apart to see how bad things are. I knew the PTFE would give way at some point. 🙁

I’ll post more details later. If the PTFE glued into my extruder isn’t ruined, I’ll try repairing it, but if I can’t, I may use this as an excuse to just buy the printed pieces to a Wade’s extruder from Tony or someone (I have all of the rest of the pieces in an unopened McMaster box).

It helps to actually have infill!

Monday, August 16th, 2010

So in the comments for my last post, whosawhatsis said he had similar problems to mine, and gave a link to a page showing his lineup of print attempts. A comment on that page by Tony Buser struck me as the answer to my problems… and in fact, it was (at least to most of them.. I still don’t have a water-tight minimug).

I filed a bug about the problem in the RepRap Host software which was leading to hollow prints. Basically the mistake I was making was assuming that the “Extruder0”, “Extruder1”, “Extruder2”, and “Extruder3” tabs in the RepRap Host preferences window corresponded to multiple physical extruders. They don’t. They correspond to extruder PROFILES, each of which maps to a physical extruder (they can all map to the same one).

I’d changed the NumberOfExtruders preference field from 3 down to 1, because I only have one physical extruder on my Mendel. Bzzzz.. Wrong. (I think the UI could be more clear on the distinction, but that’s not the only problem).

Here’s how it actually works.. Each “Extruder” tab (with all of its’ corresponding values, such as temperature, speed, etc) represents an extruder profile. So you could have one for PLA, and one for ABS, both of which have different values. By default the NumberOfExtruders value is 3, and the first three extruder profiles are:

Extruder0 (“PLA”)
Extruder1 (“PLA-support”)
Extruder2 (“PLA-infill”)

When you print (usually to a gcode file), you get a choice of which profile to use. Here you’d choose PLA.

But if you look at the preferences within an Extruder tab, you see there are three fields that refer to extruder profiles by name:

  • ExtruderX_MaterialType(name) – this is the name of this profile.. Extruder0_MaterialType(name) is “PLA”.
  • ExtruderX_SupportMaterialType(name) – this is the name of the profile to use to print support material
  • ExtruderX_InFillMaterialType(name) – this is the name of the profile to use to print infill (the inside of an object)

…but when it looks for those named profiles, it only looks up as high as the NumberOfExtruders preference field specifies.

So, I had set NumberOfExtruders to 1, I went to print, I printed with the only extruder profile available extruder 0, “PLA”, because Extruder0_MaterialType(name)=”PLA”. But during that print, when it made it to the point where it would print infill (where there was a solid, which in the case of a minimug is the bottom of the mug), it would see that Extruder0_InFillMaterialType(name) was “PLA-infill”, so it looked for which extruder profile had the MaterialType(name) of “PLA-infill”. That should have been extruder profile 2, but it didn’t get that high, because NumberOfExtruders was 1, so it didn’t find it. At this point, the RepRap Host software didn’t have an extruder profile to print the infill with, so it didn’t – it left the infill space completely empty.

So the inside of the bottom of my minimugs (and the solid part of any of the gears or other pieces I was trying to print) were coming out hollow.

When I realized this, I couldn’t wait to try it out, but I couldn’t actually print until Friday evening.

My first approach was to change Extruder0_InFillMaterialType(name) from “PLA-infill” to “PLA”, and leave NumberOfExtruders at 1.

This yielded an absolutely beautiful print. Sadly, it still wasn’t water tight, but it was beautiful. Pics and video say it all:

(click image for unscaled image – scaling ruins the 3D effect)

Ok.. So one point worth mentioning about the above before going on – I said you could see both rings that make up the minimug.. That’s actually because I had Extruder0_NumberOfShells(0..N) set to 2.

I tried testing JeffTry22, but sadly it wasn’t watertight.

Encouraged though by the infill discovery and the knowledge that all of my prints should be much better now, I decided to try printing the large 39-tooth gear for Wade’s extruder. That print started showing serious problems almost immediately, but I let it go so I could study the results. It would start trying to print the outer teeth of the gear, going very slowly on each gear tooth, and by the time it completed the circle near the first tooth the print head didn’t line up – it was more like an inward spiral than a circle. After that point (on the same layer), the infill would start to print, offset by a huge amount (it was way to the right of where it should be). Once the layer finished, it’d home, and lay down the next layer fine, but with the same consistent problems as before.

(Sorry that this next video is truncated..)

I figured it was clearly an X-axis problem of some sort, where the X-axis was accumulating error during a layer (which is later corrected while homing). I thought perhaps I was missing steps. I tried increasing the current on the X-axis stepper controller board, but didn’t rerun this particular gear print yet so I don’t know that it fixed it.

I thought that the same x-skipping (if that’s what it was) might explain why the two circles that make up my minimug walls weren’t exactly concentric, but rather they kissed on the left side. That would explain the “gap” between layers that I was finally able to see in JeffTry22 above. I DID try printing other minimugs, and looked to see if the circles were any more concentric than they were – they weren’t (that I could see), so that’s the most verification I’ve currently done as to whether turning up the potentiometer actually did anything meaningful.

It could also be the tension on the X-axis belt (too loose? too tight?), or maybe the bearings aren’t turning well after the rust-like issue I’d had before (although the rods are clean and silicone-greased, maybe the bearings aren’t smooth anymore?).

Or, it could be the filament being tight (which it was during the end of that gear print – I hadn’t fed enough spare line out by hand), and rubbing up against the threaded rod.. (I have some tape on it now to make it smoother..)

So realizing that the effect of any X-skipping seemed to matter most with big complicated prints, I figured I’d try printing out the small gear (which hopefully wouldn’t be affected much if at all), and later I’d try to artificially increase x-skipping on minimugs by trying to print four at once.. But I’m getting ahead of myself.

Here was the result of re-printing the small gear. Much better with infill, but still not great:

After that, I decided I’d save my preferences file (I saved away JeffTry22’s, that’s for sure), and try starting from scratch, using multiple extruder profiles (instead of just the one, pointing at itself for infill), and see how that goes.

The minimug came out horrible. It printed MUCH faster – I guess I’d forgotten that I had the speed set lower than before (which is funny because a student at work who had built a Darwin a while back saw a previous video of my Mendel printing and remarked that it was much faster than the Darwin used to print). I haven’t tried going back to 2 shells at the same “slower” speed (1000) but keeping the 3-profiles, to see if I can get a JeffTry22-equivalent with three profiles. What I did notice though was that the infill was far more sparse with the 3 profiles (as you’d want for anything other than a water-tight object.. infill is supposed to be just a support lattice inside a structure), so again maybe I should go back to just one, and try to tighten that up.. (I’d tried a gap of like 0.1 instead of 0.7 and it caused an array index out of bounds exception, so I reverted.. maybe I went smaller than the default extrusion size or something).

Here was that minimug attempt with the faster speed:

The messy print on the left in this next picture is the result of reverting preferences.. The print on the right is old.

After changing some settings back to what should have been correct, I tried printing 4 minimugs at a time, for the hell of it. Yeah, it didn’t go so well. An error in one of the three can carry onto the others, if it grabs a glob of molten plastic and drags it across, etc.

(I also left this completely unattended, so bad prints look worse because they build on top of failed bases, etc).

And finally, here’s a quick video that shows the extruder actually working correctly, digging notches into the filament to get a grip on it. The youtube compressed version doesn’t show it quite as well as the original, but I’ll include it here anyway:

That’s it for now! Go back and look at those JeffTry22 success pictures above – that’s what I’m remembering. (I actually lost count of how many successful ones of that I printed).

Stumbling, learning to walk, but not walking yet..

Monday, August 9th, 2010

I’m thirsty. I want a water-tight minimug from my RepRap so I can toast it’s success. But alas, I cannot. Yet.

I’ve been printing a lot, trying to get better. Progress comes and goes. There’s joy and disappointment. But the march continues.

Lots of pictures and video – as much as the huge post a few posts ago. Let’s start with how I got to even be printing in the first place.

Before the first minimug of the last post, I was waiting on a new higher-torque stepper motor to arrive. It arrived:

According to the reprap.org Stepper Motor page that model stepper motor should have a 3/16″ diameter shaft (4.7625mm, which is smaller than 5mm), which was disappointing because I thought it might complicate cutting splines onto the shaft, but I went with it anyway. I was pleasantly surprised to find out that the shaft was in fact 5mm:

Great.. So I went about cutting splines into the shaft, just as I’d done on the previous stepper motor, using the same rig.

Here is the old motor and the new motor side by side. Guess which has more torque?

Unfortunately, when I went to install the stepper motor, if I pushed it right up against the plastic for mounting, the part of the shaft that was splined was actually not quite in the center.. So plastic coming down through the hole in the top of the piece wouldn’t be lined up with the splines. In fact, this may have even been the case with the original stepper motor ( 😮 ), where perhaps only part of the splines were reaching the plastic. I still think the higher torque was required though, after seeing the rest of what I’ve gone through.

So I went about spacing the stepper motor away from the plastic with washers, which was not terribly fun. It would have been easier if I’d just removed the extruder piece from the carriage and held the whole thing sideways, but I didn’t want to have to worry about the trapped hex nuts falling out of their plastic spacings, so instead I spent way more energy worrying about dropping washers everywhere.

Anyway, I finally mounted it, and after a brief panic when it didn’t initially work, I soon got to this:

Successful powered extrusion! I can’t remember if it was the first try after that, or maybe one or two more, but then came JeffTry15 (my first minimug, from the last post).

Here was a video taken during that momentous print:

The quest for the water-tight minimug started there. Part of the quest is for tradition – I want to toast my successful printer with a thimble-sized shotglass that it itself made. Another part is functional – if I can’t print a minimug with enough precision to hold water, how can I print a functioning geared extruder to replace this one? That last sentence would have me wondering, but I’m getting ahead of myself.

Here was minimug #2 (on the left), next to minimug #1 (on the right):

Here they are on another surface, swapped (#1 on left):

…and on another surface:

On minimug #2, you can see the bottom layer here because it was off, but not off enough to be outside the print.. The bottom layer is very thin, compared with the rest of the layers (and in PLA, it looks like the only layer that has any chance of being water tight).

There was promising set of preference fields in the RepRap host software that I thought would help in making a water-tight base, but they didn’t pan out (I’m all ears if someone has suggestions):

FoundationLayers – (The number of layers of material to put down under the object being built before building proper starts.)
Extruder0_ExtrusionFoundationWidth(mm) – The gap between the infill zig-zag pattern used to fill the interior of the foundations (if any).
Extruder0_ExtrusionLastFoundationWidth(mm) – same as above for last foundation layer only

When I tried setting FoundationLayers to 6, the RepRap repeatedly homed 6 times, each time moving up a bit, with basically empty layers (no “foundation” was printed). Then plastic extruded wouldn’t stick to the base, so I had to cancel that print (and the idea of using those fields).

At one point (probably later than this, I can’t remember) I tried using skeinforge again with tonokip’s mendel skeinforge settings, but without the “shield” behavior that the RepRap host software usually does, it didn’t manage to extrude the first layer well and I went back to the RepRap host software.

So anyway, after the 2nd print I was able to make my third minimug, which was probably the best one yet.. To make this I took the JeffTry15 file that made the first minimug, copied it, and by hand added four lines before the Layer1 comment:

G28 X0 ;set x 0 - added by JLK by hand
G28 Y0 ;set y 0 - added by JLK by hand
G28 X0 ;set x 0 - added by JLK by hand
G28 Y0 ;set y 0 - added by JLK by hand

This was necessary because after going to the dump location and purging, my Mendel was having some strange problem where it wouldn’t go to the correct X location. I can’t describe it – X travel usually works fine, but after this particular move, it would often (almost always, if not always) be wrong. So adding the above explicit home command (even twice for meaningless good measure!) fixed that problem.

I also put some tape over my Y opto endstop, on the theory that it was too reflective and that was screwing up Y-axis homing every once in a while. It did seem to fix it (I didn’t see that occur during the next print), but I have seen it miss Y again since then, so I’m not 100% sure.

Anyway, the explicit homing code added to the gcode file, plus the y-axis optoflag tape, yielded this – minimug #3:

Third minimug:

It still wasn’t water tight. The next two prints were horrible..

Fourth minimug:

The fifth was worse:

I filmed this next video lineup/diary right as the sixth was beginning to print (in the dump/purge phase):

This next video, which was filmed during the printing of minimug #6, is an example video I’ll probably use when trying to describe to someone what a RepRap is, what I’ve built, and what it looks like when printing (at least for now):

The resulting minimug #6 was indeed better than #4 or #5, but showed signs of burn PLA.. I need to start keeping track of each print with its temperature and settings, etc, like a scientist.. (well, I’m trying through these videos, but I can’t remember what the temperature was for that print):

(That tall L-shaped thing to the front-left of the cylinder in those pictures is the “shield” that the RepRap host prints out every layer, to ensure there’s plastic in the nozzle before printing)

Another lineup of mugs (mug-shots.. aaaahaha!! ha! ahhh… ha.. hmmrph.. cough… (crickets)):

After this many minimugs, I was itching to try printing something else, if not just to eliminate the possibility that maybe making a water-tight minimug out of PLA was tougher than creating solid usable parts for Wade’s extruder. So I tried printing nophead’s beefed up version of the idle bracket for Wade’s extruder. The result was not good:

I tried printing another one, which came out worse:

…and here they are, side by side, with the 2nd worse one on the left:

Back to minimug attempts, and ended up with a few like this that didn’t even get to be minimugs:

Another, larger, lineup:

And then, just to satisfy my curiosity about minimug #7, I taped the bottom and went to see if it could hold any water at all.. It was cool to try, because when it’s under water it’s almost invisible (just like when they dip plastic rods into water in a science museum exhibit to teach about light refraction):

Ok, maybe it wasn’t invisible, but it was cooler than I expected.. I forsee someone uploading a small water pistol to thingiverse (if that doesn’t run afoul of the general aversion to gun-related anything in the RepRap project, or any such feelings that might exist at thingiverse).

But I digress. Next I tried printing another piece of Wade’s extruder (since my first part went so well). I think it’s because when you’re in the middle of a run of failed attempts at something, there’s a desire to try something else, if not to just avoid the “insanity is trying the same thing repeatedly and expecting different results” trap.. Even though yeah, I was making parameter and temperature changes each time, so it wasn’t actually the same, it still felt the same at the end when you had a leaky minimug.

I tried printing the smaller of the two gears for Wade’s extruder (again, I went with a variation by nophead, this one having an area to slide an M3 nut into for a set screw.

I gave that one another try, and this time the latter print turned out better.. It’s still unusable, but at least this time it looks like a gear and you can see more than one tooth!

Undeterred by my lack of success (which should have pushed me back towards experimenting with different temperatures, remounting the extruder several times, and messing with print settings to get a perfect minimug), I decided to try something even crazier – see how far it would make it printing out a whole sheet of Mendel parts from one of the RFO files that ships with the RepRap Host software.. (ok maybe this one was just wanting to see what the UI looked like after I clicked the “Load RFO” button).. I loaded tray 1, removed the pieces that I absolutely didn’t need (the belt splitter jig pieces), and tried generating gcode (which took a while). Here was what the software showed me the build would look like:

But after printing what actually might have been an almost workable layer for the first piece or two, it lost any ability to extrude enough plastic (temperature problem? jam? who knows), and this was the result:

Yeah.. So, couple that with the fact that I knew I shouldn’t be wasting time on that yet because I wasn’t even there quality wise, and I headed back towards minimugs.. Except I didn’t actually get to making another mug yet (before the time of this post, anyway). I wanted to try something different, and one of the questions that had been nagging me was whether ANYONE had made a successful minimug out of PLA with the RepRap Host software.. (maybe everyone had been using ABS with skeinforge?).. So I decided I’d do what I’d told myself I didn’t want to do yet – try extruding ABS.

The problem was I didn’t want to get some PLA/ABS mix globbed up inside the extruder, but it’s not the end of the world if that happens, so I gave it a go (I’ve certainly printed enough ABS parts out on the Makerbot – that’s what most of my Mendel is made from!).

My first problem was what to print on.. On the Makerbot I’d found that double-sided tape on the acrylic bed worked ok.. I had some of it around, and despite my uneasy feeling about it, I tried putting it on the MDF bed:

I was able to extrude some ABS, although not a hell of a lot, so I shouldn’t have even tried printing but I did.. I guess I didn’t press down the tape well enough and it floated higher than the masking tape usually does, because this wonderful thing happened:

At least I have some scraps of ABS to remind myself that yes I’ve tried ABS on my Mendel:

That’s basically where I left it.. Next time I turn on my printer I either have to do more ABS experiments or flush the ABS out of the system to get back to PLA extrusion (which is always fun because of the temperature issues, etc). I’ve got this haunting feeling that time is creeping up on me, and that I’ll have to rebuild the heater barrel again someday (based only on my Makerbot experience, but that was usually after printing dozens of parts, so I’m hopefully nowhere near needing to do that yet). I can’t wait to get to the point where I’m printing out good usable solid pieces from PLA, like I did when I finally printed my extruder piece out of PLA back in December.

I’m tempted to ask people for advice (ok, screw tempted – feel free to submit advice in the comments!), but I shouldn’t need to – I’m my own source of advice! I’ve done this, with this very spool of PLA! The differences here are:

1) Obviously, it’s a different printer (Makerbot vs Mendel), with different quirks
1a) The extruder strength is different
1b) The extruder grip (gear vs splined shaft) is different
1c) The idler wheel spacing is different (known spacer bar for Makerbot, unknown for me)
1d) The idler wheel spacing will slip more over time here (fixed by other extruder pieces)
2) I’m using the RepRap Host software instead of skeinforge to do my slicing
3) I don’t have any idea which thermistor I’m using, so I haven’t changed firmware to reflect which thermistor I’m using, so the temperature numbers won’t necessarily be the same
4) Maybe moisture or age has affected the PLA (I doubt it, but it is a difference, and people have talked about it).

So, suggestions, stories of success/failure with others’ water-tight minimugs, etc are all welcome. While typing this I did a google image search on “minimug success” and one of the images was this beautiful minimug (looks like ABS) that Zach made back in 2008. I’m drooling. I wonder what size nozzle that was? Bigger?

That’s it for now!