Archive for March, 2010

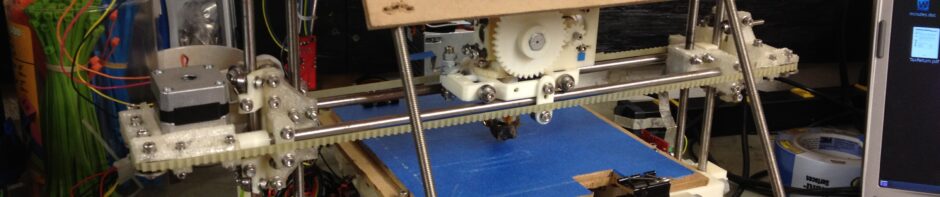
Done cutting rod, continuing X axis build

Friday, March 19th, 2010

Since the last blog post I’ve finished cutting all of the smooth and threaded rod, and I’m on to assembling more of my Mendel.

One thing I learned was that the diamond cutting wheel wasn’t the right thing to use to cut steel rod. They sell fibreglass reinforced cutting wheels which cut through much quicker.. I did go through three of them, but it was worth it.

I also learned that my lithium ion rechargeable Dremel wasn’t the way to go. My friend Tom Royer offered to lend me his corded Dremel, which I took him up on:

Then another friend at work offered to lend me the Dremel Flex-Shaft extension, which lets you cut straighter through the rod because the body of the drill doesn’t hit the bar you’re cutting. Here are the two combined, with a fibreglass reinforced cutting wheel, then a closeup of the wheel:

(I’ve since ordered a Flex-Shaft extension to have one of my own. I haven’t bought a corded Dremel yet)

Here’s a picture of how I protect my face from a stream of sparks and small bits of metal, looking like I’m straight out of a serial killer horror movie:

But before I can cut, I need to clean the dirty protective grease they coat these with before shipping. For the smooth rods that was easy enough, but for the threaded rods it wasn’t trivial. I put the rod in the chuck of a drill, wrapped some tissues around the other end of the rod, and started running the drill at some medium speed which would cause the tissues to ever so slowly lower on the rod while cleaning.

Later I realized it was easier if I had three clamps on the tissues, and that I could run the drill faster that way and still actually clean it.

Here’s what the rod looked like before:

..and here’s after cleaning:

The inside of the tissue shows exactly what gunk I just cleaned off:

Here are all the completed rods (at least I think this picture was of all of them – they’re all done now):

Once I had the rods all cut to size, I was actually a bit overwhelmed about the amount of things I have left to do, and more specifically the choices I had as to what to work on next. It didn’t take long before I went back to assembling the X axis. First, I adjusted the spacer bolts on the X carriage and mounted the extruder piece, skipping the attachment of the stepper motor, PTFE insulator, and heater barrel for now. (I need to design some equivalent of a retainer to hold the heater barrel into the PTFE (and hold that into the extruder piece) similar to how the MakerBot’s extruder does it, because I can’t afford to glue a PTFE insulator into one of my only extruder RP pieces until I have a working printer). I also mounted the opto endflag, made out of a Coke can. That will be used in conjunction with an optical sensor to home the device.

Then I assembled the “Vert bearing 180” assembly:

Here’s a truncated video (I ran out of space on my phone again) showing a few of the pieces:

Then I started the Vert Bearing 360 assembly. Here’s are two pictures of it mid-way, with a piece of scrap threaded rod in the middle to illustrate the trapped M8 nut in the center of the assembly:

I’ve actually completed that now, but I’m too tired to upload the photo now – I’ll include that in my next post.

And again since I’m tired, here are just a bunch of remaining pictures that I wanted to include.. The ribbon cable I ordered for wiring arrived:

..and I now have all three pieces of the belt splitter jig (here’s how they fit together):

I finally purchased some silicone grease for the rods (that won’t hurt the plastic, while other types of grease can):

..and last but not least, here’s Cara examining the Idler Bracket assembly:

Cara turns 3 on Sunday! Happy Birthday Cara!

Ok, Jeff sleep now.

Cutting Thick Sheet Pieces and Rod

Sunday, March 7th, 2010

Here’s a bit more progress that I made today. I finally got around to cutting the bed, circuit board holder, and other pieces out of MDF (medium density fibreboard).

I don’t have easy access to a plotter, so I needed to print the dxf file for the thick sheet template out on multiple pages and arrange them together correctly. I thought it would be easy to find software that did this, but I didn’t find anything easily at first. Eventually I found some shareware package for windows called CADViewX Lite, which had a demo called CAD Open in Word that let me open a dxf file and print it across multiple pages (with hash lines). It didn’t work as nicely as I’d have liked, but with a few measurements and careful alignments I was able to lay out the pages on the MDF and tape them down with single and double sided tape:

The MDF sheet I had was an unwieldy 2′ x 4′, so first I cut off the relevant area:

Many cuts with the jigsaw later, I’d cut out the five pieces (scotch taping the template down again to the newly cut sides as I went). I’ll drill the holes and jigsaw out the internal ovals later.

Here’s the bed that the Mendel will print on:

I also was cutting rod today. Here are the fully completed smooth rod pieces, which make up the X, Y, and Z axes:

Those were cut out of 3 original rods. In addition to the 3 original smooth rods, there are 9 threaded rods that need to be cut into many pieces. I was able to get through one of those today, resulting in 3 threaded rod pieces:

Unfortunately the cutting drains the rechargable battery on my Dremel like crazy. I went to the store looking for a spare rechargable battery (quite naively) and of course no one carries them locally. I considered buying a 2nd Dremel that was corded, but even if I can only cut 1-2 rods every 3 hours, I’ll still get them all done pretty quickly, so it didn’t seem worth it. (I may just do more cutting with a hack saw, but it’s a pain). I did order a spare battery online – it’ll probably arrive by the time my Mendel is fully completed. 🙂

Oh, one more off-topic thing.. Last week when I ordered some red and black wire for the power connections from sparkfun.com, I saw they had some stepper motors that looked to both be NEMA 17 and have more holding torque than the ones I’d purchased from makerbot.com (at least that’s what I thought after a quick calculation.. I might be wrong). We’ll see when they arrive – they were cheap enough that it won’t break me if I bought four extra steppers for nothing – I’ll find a home for them.

Next up – a lot more cutting of threaded rod, drilling holes in the MDF, more assembly of the X carriage, and a bunch of electronics work to redo the boards I have for Mendel.

Parts Acquired! Building has commenced!!

Saturday, March 6th, 2010

Huzzah! There is good in the world. Progress continues.

In my previous post, I described how my place of work had asked for the MakerBot (which I was using as a RepStrap) back; it was originally made available to Chris and I as part of a “technology library”. I’d still had six pieces left to go (as it turns out, actually seven).

Good people came to the rescue. mccoyn built and sent me two z-leadscrew-base pieces and a z-motor-bracket:

Seeing those parts actually completed out of PLA, I’m greatly encouraged. My most recent attempts had all jammed up at some point during the long builds. I’ve told the next person that received the MakerBot that they need to rebuild the heater barrel assembly (this time actually using a new heater barrel and nozzle, because that seems to be completely gunked up), so maybe the original RepStrap will be able to print those parts out too someday – I hope never to find out, as I want to print those parts on my Mendel. 🙂

In parallel with mccoyn‘s offer, I’d had a discussion with key people at work (I’ll omit names as I’m guessing they’d prefer that). Luckily I was able to thank the person responsible for ordering the MakerBot in the first place and setting up that technology library; hopefully I conveyed just how thankful I was for this. I also managed to get permission to have a few parts printed at work with a commercial Stratasys 3D printer. When it turned out that I actually had overlap between some of those parts and mccoyn‘s pieces, I decided I’d use mccoyn‘s and put the ones from work in the shoe box of spare parts (if not directly onto Chris’s Mendel, which will be the first set I start printing once I have my Mendel working, soon to be followed by a set for my brother Jon – who already has one piece. 🙂 ).

Here’s an example of what the z-leadscrew-base printed on the Stratasys printer looked like (this was printed with ABS, and there was some support material used and washed away in a bath after):

I received offers from at least two other people privately to potentially supply me with pieces if I needed them (when they got their printer working). Thanks to all!

Ok, so on to building. First, I spent an evening midweek figuring out exactly which items I had to order for wiring. Adrian’s excellent video illustration helped clear up any confusion I’d had about what went where. My spool of ribbon cable and lots of connectors will arrive probably around Monday, just in time to completely miss the weekend. That’s ok though, because I have a lot to do before I get to wiring.

First was cutting the metal rods and studding. I’ve put that off for a while, and just started on it last night. When I purchased the non-studded (smooth) rod for the X, Y, and Z axes, I went with A2 steel (even though I’d heard people say it was a pain to cut). It turns out it was relatively easy. A while back, in anticipation of this, I’d purchased a diamond cutting wheel for my Mendel for around $15 (maybe that’s overkill – I have no idea):

Here’s a quick video showing the sparks it created:

Before filing it down, here’s what it looked like after the cut:

I was supposed to cut it to 406mm (with a tolerance of +/- 1mm). I think I did pretty well:

The battery on my Dremmel needed recharging, so I was able to stop long enough to post this entry. Rather than building up a long post, I think I’ll just post this one now and follow up with more later. Another thing I’m doing this weekend is making an attempt at cutting out the MDF bed pieces with a jigsaw. There is a nice laser cutter at work that I might be able to talk someone into letting me use to cut pieces out of MDF, but it’d be nice if it was doable at home. Either way I bought a 2nd piece of MDF at Home Depot today after Emily and Alicia’s first-Saturday-of-the-month building time (this month they made a rain guage). But I digress. 🙂

More later. Once again, thanks mccoyn and unnamed person from work, both of which spent lots of time printing me pieces! I swear I’ll pay it forward!