Archive for September, 2014

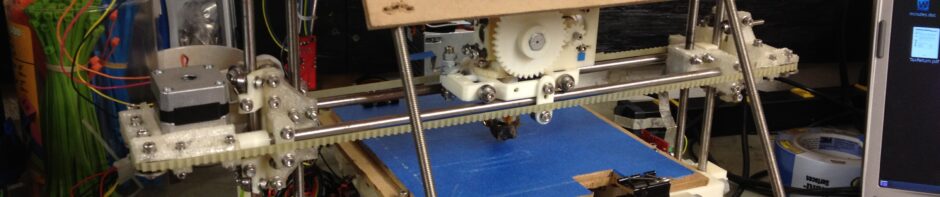
Four, no, 45 months.. part 21 of ?

Thursday, September 18th, 2014

More of my RepRap blog! I’d love to at least catch up to covering last year’s Makerfaire (Makerfaire NY 2013) before this year’s Makerfaire, which is at the end of this week (on September 20 & 21, 2014). That won’t be this post, but the more I post, the closer we get.

Having just given the Museum of Science the RepRap I made for them in the last post, I was now free to work on my 2nd RepRap for myself (the same model – a Prusa IT2, to go along with my first original (Sell’s) Mendel). Luckily I’d started it before the handoff, so it was easier to get working on it.

I found another picture of cut and ground rods, although to be honest I can’t remember whose those are.

IMG_3186

IMG_3187

They look slightly rusted, which I’m confused by because at this point I had my grinder and would have cleaned them off. They’re not for my RepRap since its frame was already built. Maybe Joe Werther’s? Too many RepRaps – I’m losing track. 🙂

I had tried designing a version of the OpenX carriage for the Prusa IT2 since I liked removing the carriage easily. I printed these out, but I don’t think I ever used them:

IMG_3260

Anyway, continuing my frame assembly, I added the bottom rod and top rods, with the z-motor-mounts and bar clamps.

IMG_3262

It was time for the bed..

IMG_3265

IMG_3266

Here was a note I made to myself about how to attach the LM8UU holders beneath the bed:

Here is the bed mounted on the frame:

IMG_3268

…and here is a video showing just how smooth it glides.. oooooh..

…and another showing the same from the bottom:

Then I added the y-axis motor and belt.

IMG_3272

To test it, I’d need the electronics set up. A year ago (from that point) at Makerfaire 2012, I’d seen Johnny Russell selling the RAMBo board (RAMPS but all in one board), and I’d decided to go with that for my 2nd RepRap. (I had an earlier version than the one I just linked to).

For the Museum of Science’s RepRap I’d printed out this Sliding Lid RAMPS 1.4 box to hold the RAMPS and Arduino Mega board I’d used. I liked that and wanted it for RAMBo, so I designed my own, derived from that one.

A few prints later and it was done. It’s on thingiverse.com now: RAMBo Box

IMG_3364

IMG_3365

IMG_3376

IMG_3373

IMG_3501

For the time being I left the RAMBo Box to the side, but wired up. Now I could finally test my Y axis!

Then I made it a little faster..

…then a little faster than that..

I assembled part of my X-axis next.

IMG_3293

IMG_3294

IMG_3295

So now it was time to line up the X-axis, and adjust the Z-axis motor mounts on the top bars (again, remember that I did the modification of adding an extra nut between the frame vertex and the z-motor-mount so I can adjust it.. I had to use slightly longer smooth rods for the X-axis to do that).

I did the same thing I’d talked about in previous posts for the MoS RepRap, but this time I just used two M8 nuts for plumbs instead of some bulky purchased one. They worked better anyway.

IMG_3394

IMG_3395

IMG_3396

IMG_3397

I carefully slid in the smooth Z rods and tightened them, and could then raise the X-axis along the Z-axis by hand.

IMG_3398

IMG_3399

Then I installed the Z motor mounts and leadscrews. Here is the X-axis being suspended on its own by the leadscrews:

IMG_3400

When I first tried moving in Z, I saw some z-wobble, but wasn’t convinced it would affect the x-axis in the end:

That led to this video of my phone lying on the bed shooting up as the Z axis moves up and down.

Although I hadn’t run into it with the previous Prusa IT2 I made, I was now having problems with the M8 nuts being too loose in the X-ends, I think:

IMG_3404

After fixing the problem with the nuts (I’m not entirely sure how, it was over a year ago, but I imagine I turned off the motors, pushed down to compress the spring, rotated the nut so it fit in the shaft, then released the x-end), I finally had things working. I put on the X-carriage that I’d reluctantly decided to go with instead of the OpenX carriage (which was much better than the previous one I’d used), and made this video demonstrating X, Y, and Z motion!

Woohoo!

Next, I wired up the heatbed and covered the bottom with a large sheet of kapton tape.

IMG_3505

IMG_3506

IMG_3507

For future reference, I used four nuts for spacing:

IMG_3515

Here is what the RepRap looked like with the bed mounted:

IMG_3510

…and here it is next to its parent, my original RepRap (an original “Sells” Mendel):

IMG_3509

Note in that picture I also had my RAMBo box mounted. I installed it on the frame (with one of these, although note to self: I should upload the slight change I made to that to get it to fit my upper bars since I have the extra nuts up there).

I permanently mounted my RAMBo Box on the green holder piece, as you can see by the screw in the middle behind the board in the next two pictures. I basically held it in place and drilled a hole through, then fastened it with a bolt, two washers, and a nut.

IMG_3544

IMG_3545

IMG_3548

I made a nice hobbed bolt on my lathe using my bolt hobbing tool:

IMG_3496

As for power, this time around I wanted a bit more of a self-contained RepRap than my first one, which has a computer power supply dangling off of it and a ton of wires. I bought this power supply, which I wanted to mount below the bed:

IMG_3406

IMG_3409

IMG_3410

IMG_3411

At first I just rested it beneath the RepRap until I could get something better set up:

IMG_3508

I made sure that the Y belt didn’t hit the power supply.

The first time that I wired it up to try using it for power, it looked like an electrician’s nightmare. Don’t follow my example as instructional – I was super cautious but don’t recommend testing things out this way.

IMG_3512

IMG_3519

IMG_3513

I printed a few of these holders for the power supply designed by my friend Chris, so it can hang from the bottom bars below the bed.

IMG_3527

Here it is, mounted:

IMG_3531

IMG_3533

IMG_3535

The y-belt still just barely clears it..

IMG_3537

IMG_3536

Here’s a tragically truncated video describing it:

Trying to move as quickly as possible, I attached my old Wade’s extruder to the carriage, since I had it lying around.

IMG_3542

I was in such a rush to get this done (and under so much self-imposed pressure, both for an upcoming RepRap gettogether and eventually Makerfaire 2013) that I actually found myself marking off projects in a project management tool (in my case, OmniPlan). I know. And yet, it helped.

IMG_3553

And here’s a video of me printing on my original RepRap, waiting to try printing on my new RepRap. I hadn’t yet gotten the hang of driving two RepRaps from the same laptop, which I’d later master. 🙂

Here was the result of that print on my original RepRap, showing some new rice-crispies like failure:

IMG_3554

IMG_3555

So I tried extruding plastic on my new RepRap, and here was its first extusion:

IMG_3557

It then, however, failed.

IMG_3558

IMG_3559

IMG_3562

I hate ending on a bad note like that, but I have to go to bed because tomorrow I’m driving to New York for Makerfaire 2014. I know, I still haven’t blogged about Makerfaire 2013!! I was hoping to get to it – I’m about one or two posts away from it, but it doesn’t look like I’m going to have time. We’re now caught up to July 16th 2013, while today’s actual date is early in the morning of September 18th, 2014.

Reminder: In two days I’m going to exhibit at Makerfaire NY 2014, for my third time. Buy your tickets now and come see me! If I can drag two RepRaps down in a car from the north end of Massachusetts to Queens, New York, you can drag yourself down there.. it’s a great time!

mf_newyork_seemethere_125x125 mf14ny_badge

Giving the MoS their RepRap – Four, no, 45 months.. part 20 of ?

Saturday, September 13th, 2014

On April 27th 2013, I started cutting the rods for my second RepRap (a Prusa IT2). I was just about to permanently give the other Prusa IT2 that I’d printed and assembled to the Museum of Science in Boston (see more below!), so I wanted to overlap them and start construction on mine before handing them theirs, to keep my motivation up and avoid any empty nest syndrome. 🙂

Here are two of the pictures of the rods, freshly cut and ground, as I posted at the end of the last post:

IMG_2548

IMG_2546

I started assembling the frame..

IMG_2570

Then I got to the Y-motor mount on the front. I had decided to try a new version that had an integrated belt-tensioner (this one here)). I had the one I’d printed for Joe Werther, but I couldn’t find the one I’d printed for myself. After looking everywhere, sighing, and deciding that I must have left it at work or something (and I’d have to wait until Monday to get it), something occurred to me…..

Here’s a picture of them (you watched the video right?):

IMG_2573

Here’s a more dull one you can skip, unless you use that y-axis bracket and have problems with the trapped nut..

Here it is on the RepRap, holding the Y-axis motor:

IMG_2610

IMG_2616

Here’s just a cool picture from the side of one of the upper frame vertices:

IMG_2612

I had successfully started enough of my second RepRap that I didn’t fear any lull after giving the Museum of Science their RepRap, leaving an empty space on my desk. Ok, back to the Museum of Science’s RepRap. I was getting ready to hand it back on April 30th, 2013. The day before, I did a few last prints. I had tried printing a SOMA puzzle but the pulley on the X axis was loose and fell off, resulting in this:

IMG_2621

I fixed up the pulley but didn’t have time for another attempt at the SOMA puzzle. I printed the last print that I’d ever print on the Museum of Science’s RepRap at my house, another keychain bottle opener:

IMG_2626

Thank you Museum of Science Boston for all my childhood memories! Here is my small way of paying back.

I packed it up in the car, ready to be driven down to Boston (I’m about 30 minutes North of Boston in Methuen).

IMG_2643

Here was the view of the Museum of Science as I drove up..

IMG_2653

IMG_2654

In the Museum lobby I couldn’t resist taking this picture specifically for this post:

IMG_2655

🙂

They brought me way back out into an internal part of the Museum that I’d never seen, past the animals exhibit. I passed by a whole bunch of caged animals and at some point saw this weird (one of many?) store room with random stuff stowed away:

IMG_2660

IMG_2661

IMG_2662

(What’d they need the heads for?)

Way in the back there was some office space with just a bunch of cubicles. It was very quiet compared to the rest of the museum. That’s where we set up the RepRap so I could spend the day showing them how to print, what will break on it, how to fix it, etc.

IMG_2657

IMG_2658

IMG_2659

I spent the day helping people like Matthew Strumpf, Julia Sable, Keith Simmons, Ben Jones, Miriam Ledley (and some others whose names I can’t remember a year and half later) learn how to print with their new RepRap. It was great.

Here’s the visitors badge for the day I gave them the RepRap. I don’t know why that seemed so cool to me but it was:

IMG_2664

IMG_2666

Driving home from the museum, I rewarded myself with what is now becoming a tradition when driving home from the Museum of Science.. Vegetarians look away.. This was my meal at Tudo Na Brasa in Woburn:

IMG_2663

Again, that was April 30th, 2013. Today is September 13th, 2014, over a year and a half later. Since it was in the past, for the purposes of story telling, I can skip forward a few months (even in front of other RepRap stuff I’ll blog about later) to show you what it looked like once they put it on display. They had it in that back room for some period of time to play around with it (maybe a few months? I don’t remember). Later I heard from friends that they’d been to the Museum and saw it on display. Laurie and I took the kids down on July 21st 2013, and we got to see it set up and printing. It was glorious.

Where are we going?

(Cara’s line at the end there was “To see Daddy’s RepRap!” 🙂 )

IMG_3713

Here it is!

IMG_3737

IMG_2460

Here are some more pictures:

IMG_3722

IMG_3749

IMG_3741

While staring at it, the guy working there said something like “that’s a 3D printer!”. I said it looked great, and tried explaining that I made that printer. He nodded as if to say “ahh, yes people are doing that these days” or something, and I explained “I literally built that one right there, and gave it to Matthew Strumpf a few months ago”. He lit up with understanding, and said “oh wait, he’s in the back room. I’ll go get him”.

He came out and showed me the stuff they’d been printing with the printer.

IMG_3753

Their legendary two story tall Van de Graaff generator generator is right next to it:

IMG_3751

IMG_4079

…so they used it as an example of showing what parts look like partially printed, by making this series of prints (interrupted at different layers):

IMG_3752

They also had added a fan:

IMG_3743

and had an example of an object (a pen holder) printed without a fan (left) and with a fan (right):

IMG_3754

IMG_3755

Another example is the tall tower in this pic:

IMG_3762

On August 2nd my cousin Kevin Martin and his family came up to Boston, and we did a trip to the Museum of Science, so I got to see it again. That day Miriam Ledley was working at the desk, and she showed us an activity that they do with the kids to show how the printer builds things up layer by layer. This was such an awesome idea:

Now they had added labels to the motors, which was a nice touch for the exhibit:

IMG_4254

I have to admit, one of my guilty pleasures was sitting in the back of the room, watching other people look at the exhibit. One time in particular I remember this guy talking to his kids, describing how the printer worked. I grabbed a picture to remind myself what that felt like.

IMG_4820

It was really cool. That was something that I made, there, for everyone to learn with. Something that had given me problems because of some belt slipping or some other problem, that I had to motivate myself to work on, actually got displayed and helped people learn!

About a week ago from the time of this writing, I learned that they have closed off the CCP section of the Museum – my thoughts go out to those that I know that worked there. I have no idea what the current status of the printer is, whether it’s still on display somewhere, or if it found its way into that cage with the heads on it. 🙂 Hopefully it’ll be on display again soon.

That’s what happens when you blog about something a year and four months later – things change. 🙂

With the exception of the skip ahead to see the printer on display, that catches us up to April 30th, 2013. Still over a year and four months behind, but we’ll catch up soon.

Reminder: One week from today I’m going to exhibit at Makerfaire NY 2014, for my third time. Buy your tickets now and come see me! If I can drag two RepRaps down in a car from the north end of Massachusetts to Queens, New York, you can drag yourself down there.. it’s a great time!

mf_newyork_seemethere_125x125 mf14ny_badge