The countdown continues! 33 pieces left to print!! (out of 106)
(To the impatient – make sure you at least see the last video in this post, but really, you should be reading/watching all of it. 🙂 )
Before I was able to print out any more pieces I had to try rectifying this extruder-stops-extruding-PLA problem. Since my last blog post I’d discovered that sometimes I could just twist (rotate) the filament to get the motor to catch, instead of just pushing down hard. I also noticed that it seemed like my pushing/twisting would only be effective if the motor was about to change state. For example, I might push/twist like crazy with no luck, until it went to circle a vertical hole, at which point it would always catch. I think that when the motor fails to push for some reason (blockage, non-melted piece, covered nozzle, whatever) it “shuts off” for the rest of that command (I don’t know the extruder board firmware/hardware or the details of the extruder motor enough to validate this observation.. anyone?).
So now twisting is a part of my concern. Even with a lazy susan, PLA coils up something awful, which has to be putting rotational torque on the filament while in the extruder. So one thought I had was that maybe the teeth were dug in but then the piece twisted in some way that it couldn’t grip it anymore. (doesn’t make too much sense but the thought persisted).
So, I took apart the plastruder again and moved the idler wheel even closer to the teeth, not even using the metal spacer (I figured the spacer was made for 3mm filament, and the ultimachine PLA seems to be 2.8mm (that’s from memory, trust my earlier blog posts if they contradict that measurement)).
That helped. I think. It didn’t eliminate the problem, but it does seem less frequent.
What I also did was floss out the teeth on the extruder motor gear.. They certainly had some plastic stuck in there.

Flossing out black ABS from the extruder teeth
 from the extruder teeth")
Flossing out barely visible PLA (to the left of the pick) from the extruder teeth
My guess though is that that was never really the problem. If the caked teeth had been unable to grip filament, then I should have always heard the motor running but never actually pushing out plastic. Instead, I hear NOTHING when it has this problem. This again lends towards the idea of some kind of jam/blockage/other-motor-resistance (causing the motor to shut down until the next command).
Here’s a video where I try to document/record/illustrate the problem where the extruder motor stops even trying to push. You have to turn the sound way up and try to ignore the sound of the motor of the X and Y axes, and instead listen for the shhhhhhh shhhhh shhhhhh sound of the extruder motor:
Without any actual knowledge of the situation, I’m secretly hoping that the stepper-motor-driven Mendel extruder handles this problem better, but I have no idea whether it’s actually better or worse.
Next, for lack of a better place to put it, here’s a complete non sequitur: possibly the most exciting RepRap video ever recorded:
Assuming you’ve recovered from the exitement of that video, let’s continue. Ok.. So I was able to make some new parts.. There was this one, from the end of that last video:

x-180-z-bearing-plate_2off
..and then I got brave and tried using the Skeinforge Multiply filter to make more than one of the same part, with somewhat acceptable levels of success:

x-bar-clamp-m3_6off, done with Multiply
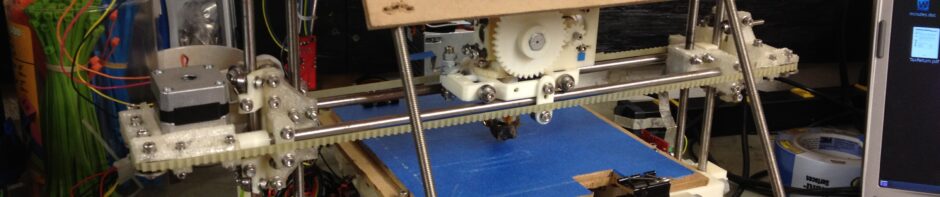
Here’s another part, which would be almost impossible to print in ABS without a heated bed or heated chamber:

Printing x-end-bracket_2off with PLA

Two instances of x-end-bracket_2off, both missing some plastic at the highest levels in those bars
A picture of all of the pieces I’ve printed since the last blog post:

The most recently printed pieces to my Mendel RepRap
Of those, here was my favorite:

x-vert-drive-side-plate-180-end_2off. When I see this piece I think of Halo 3 and Forge, as if that were a staircase leading to a ledge.
While printing parts, I also assembled more of my x-carriage. I was able to fit the M4 hex nuts into their recessed holes (despite the poor construction of the x-carriage-upper piece I’d printed) by using a soldering iron to just push them into the plastic (which worked amazingly well). That let me attach four bearings to the upper piece, and bolt it to the lower piece.
, sans extruder.")
x-carriage assembled (upper and lower parts connected, with belt clips, bearings, and fasteners), sans extruder.

Another view of the x-carriage
A particularly cool view can be seen here, where you see how the carriage mates with one of the two parallel bars that the x-carriage slides on along the X axis. Note the three bearings in the front of the picture as well as the three bearings way in the back. One of the smooth bars slides through all of those bearings.

This tunnel is where one of the smooth bars goes through. See how bearings from three sides limit Y translation, Z translation, Y rotation, and Z rotation.
On the other side of the carriage is the four bearings that go with the 2nd rod, which keep the entire carriage from rotating around the X axis formed by the first rod:

These bearings on the opposite side prevent rotation around the X axis, which in combination with the bearings from the other side restrict motion to only translation along the X axis.
And here are two good shots of those snug-in-their-melt-assisted-holes trapped M4 hex nuts:

A view of the trapped hex nuts that I massaged into their poorly-built hex-shaped holes with a soldering iron

More soldering-iron-helped trapped hex nuts
And of course, finally, video:
Thirty three more pieces left!
Pingback: random gay chat with a stranger
Pingback: free gay webcam chat rooms
Pingback: gay dating in louisiana
Pingback: top dollar slots in vegas
Pingback: free slots instant play
Pingback: heart of vegas free slots
Pingback: free vegas world slots
Pingback: virtual strip slots
Pingback: 100% free slots games
Pingback: ruby slippers slots
Pingback: liberty slots casino
Pingback: free slots download for pc
Pingback: deal no deal slots
Pingback: highest paying slots
Pingback: doubledown casino slots
Pingback: dissertation writing service
Pingback: premium dissertation writing service
Pingback: dissertation fellowships
Pingback: statistics help for dissertation
Pingback: ma dissertation writing service
Pingback: finance dissertation writing help
Pingback: 33 pieces of bot on the wall..